Want to make a rope handrail, and want to keep it simple?
Whether you’re a DIY amateur or expert, creating post holes can be a tricky job. But what if we said, there’s a way to make a rope railing – for your garden bridge, decking, flower bed etc. – without having to drill a single hole?
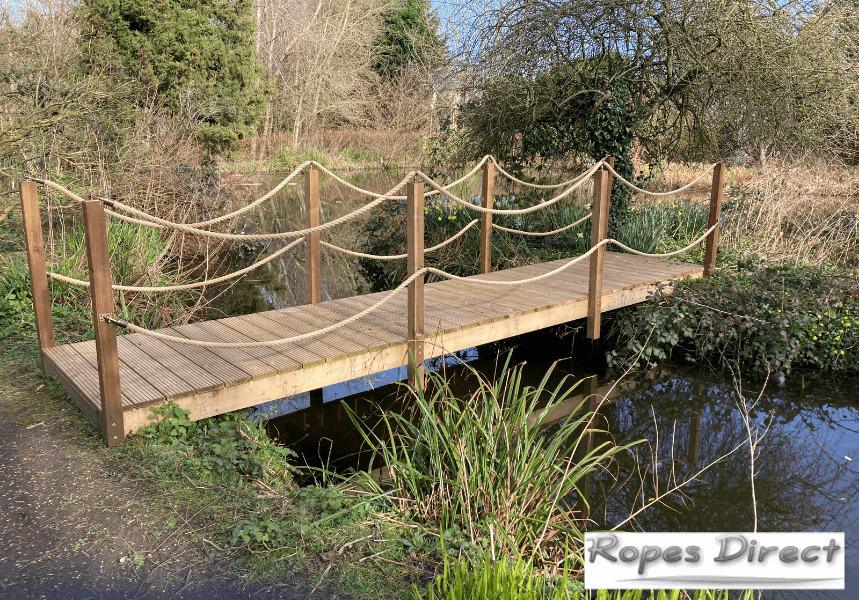
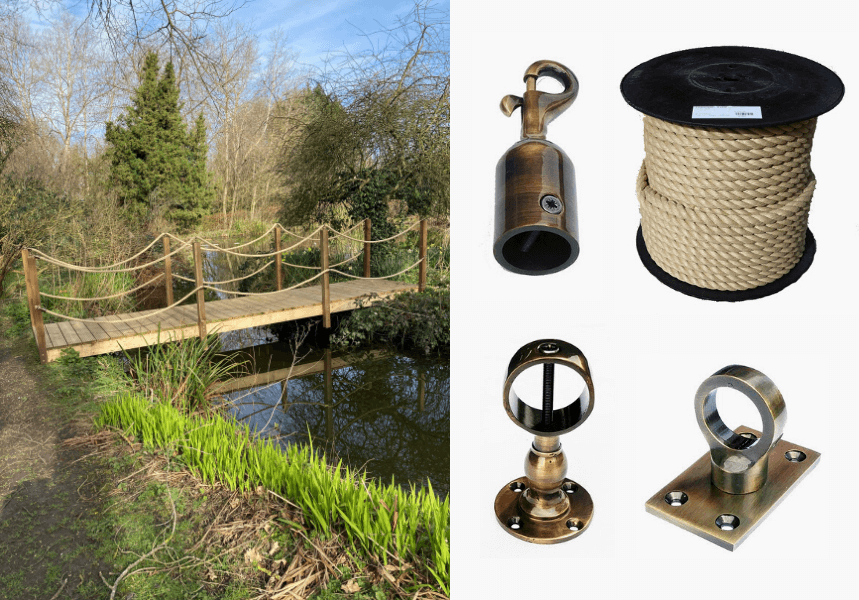
It’s true. In fact, that’s exactly what one of our recent customers did. Using a few lengths of Synthetic Hemp Rope and some Antique Brass Rope Fittings, he created a new rope handrail for a wooden lake bridge – and very kindly sent us photos of the fantastic results.
Easter is just around the corner. Which is, “officially”, the best time of year to get cracking on those outdoor projects – sprucing up the garden ready for the summer. So why not have a go? Order a few basic materials and follow our step-by-step guide on how to make a quick and easy garden handrail.
What will I need?
This can be bought on 100m reels and cut to size at home. But for most small home projects, we recommend purchasing several lengths that have been cut to size for you, by the metre. You simply enter the total amount of rope that you require in the quantity box (e.g. 24m). Then, when you checkout, type the number and lengths needed into the ‘delivery notes and additional comments’ section (e.g. 4 ropes, 6m each).
How thick should your rope be?
Our customer chose 24mm rope, which suited the look of his bridge. A 32mm rope is chunkier, particularly when viewed from a distance.
How do you measure up?
It’s really important to plan ahead when buying your rope. We advise you to measure the distance between each post, add 3-5% to allow for the swag and add a further 5cms per end to allow for the hook and eye plates. Even easier, use a piece of string to get the look just right and add 5cms per end for the hook and eye plates.
To create a rope handrail or decking barrier like the one shown, you’ll need Trigger Hooks, Eye Plates and Centre Brackets. These are available in a range of finishes, including polished brass, antique brass, black nickel, matt black, glossy chrome and satin chrome. Be sure to select fittings with the correct diameter to suit your rope.
- Basic tools
A blow torch and bradawl or similar tool will be required to add the trigger hooks to the Synthetic Hemp Rope. Then, to secure the eye plates and centre brackets to the posts, you’ll need an electric screwdriver.
4 steps to create a DIY rope handrail
Step 1: Thread your ropes through each of the brass rope fittings
Once you’ve fitted the hooks, they won’t pass through the centre brackets!
Step 2: Fit the Trigger Hooks to the end of the rope
Rope end fittings are very straightforward to install, even for a beginner. But to give you a little extra help, we’ve created a guide ‘How to fit decking rope fittings’, as well as a YouTube video tutorial. Before starting, it’s certainly worth taking a look at these and getting to grips with the process.
To summarise here, simply slot the Trigger Hook onto the end of the rope. Apply a heated bradawl into the first hole and push it straight through to the other side. Then, once you’ve created a clear pathway, insert the cross screw and drive it into the hole you’ve just created. Repeat this process for each rope end.
If you don’t have a bradawl you can improvise. We ground down an old screwdriver to a point. Other people have used a nail held by mole grips!
Step 3: Secure the rope fittings to the wooden posts
Position the rope fittings as required and secure them in place using the power screwdriver.
In the example shown, Eye Plates were placed on the first and last two rope posts. This allowed the rope to be attached using the trigger hooks. Matching Centre Brackets were then used on all other posts – one positioned at the top, one positioned half way down the post – to hold the rope in the correct position.
Step 4: Attach your rope.
All you need to do now is attach the ropes using the Trigger Hooks and End Plates. Pull the ropes gently until you’re happy with its positioning.

Eager to give it a try?
Compared to other types of rope handrail (i.e. those that require drilling post holes…), this is a really simple process that shouldn’t take too long to complete – or give you a nasty headache!
Here at RopesDirect, we have everything you need to get started – including high-quality Synthetic Hemp and a wide selection of Brass Rope Fittings. All of which are suitable for prolonged outdoor use and available for an affordable price. So what are you waiting for?
Stock up on supplies and have some fun this Easter with a new project. It won’t break the bank and, we guarantee, the results will be mightily impressive – even if you’re a DIY handrail novice!
If you do have a go, please do send us some pictures, just like our previous customer. We always love to see our ropes and rope fittings in action, and it would be great to see if your rope railing turns out as professional and attractive as theirs did! You can either send them to us directly via info@ropesdirect.co.uk, submit a testimonial, or tag us on social media using @RopesDirect.