
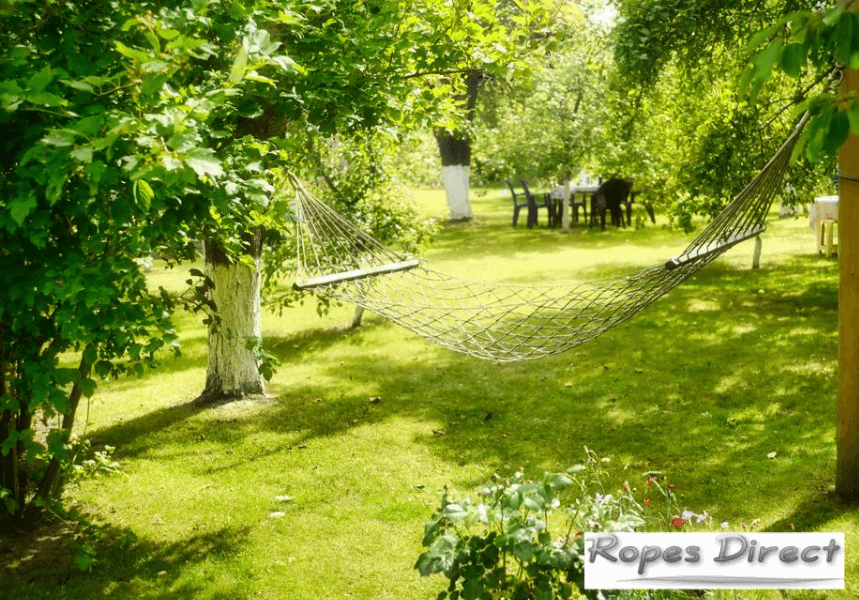
Picture it. It’s a Sunday afternoon. The chores are done, the sun is shining, and you’re lying on a comfy rope hammock – soaking up the rays, with a good book and a glass of prosecco in hand. Sounds perfect, right?
A rope hammock is a fantastic addition to any garden. Somewhere to relax on a warm summer’s day and make the most of your outdoor space. And, believe it or not, they’re actually quite easy to make. With a few lengths of rope and a couple of hours of your time, it’s possible to create a dreamy resting spot. Here we offer a simple guide to show you how.
What will I need to make a rope hammock?
Rope
For the hammock itself, we recommend using either 6mm or 8mm natural cotton rope. This is strong and durable, yet still very soft to touch and easy to handle. Alternatively, for something a little brighter (and more weather-resistant), 6mm coloured polypropylene multicord works just as well. Whichever option you choose, you will need ten separate pieces that measure 30m each.
To successfully hang the rope hammock from a tree, you will also need to purchase two additional lengths of weather-resistant synthetic hemp rope – with a soft-eye splice at one end.
Stainless steel fittings
Natural cotton rope isn’t water-resistant; therefore, your rope hammock will need to be taken inside when it rains. To facilitate this, we suggest using two stainless steel carbine hooks. These can be placed at each end of the design, allowing you to clip it on and off the trees – quickly and easily – as required.
Wooden dowels
The size of the wooden dowels will determine the size of the final rope hammock. So, it’s important to choose carefully. We typically advise using two 1m dowels, with a 30-40mm diameter.
5 steps to weave a hammock with rope
Online, you’ll find a wide range of impressive macramé patterns that can be used to create a rope hammock. But to get the best results, our advice to keep things as simple as possible. We typically recommend using this quick six-step approach:
1. Attach the rope
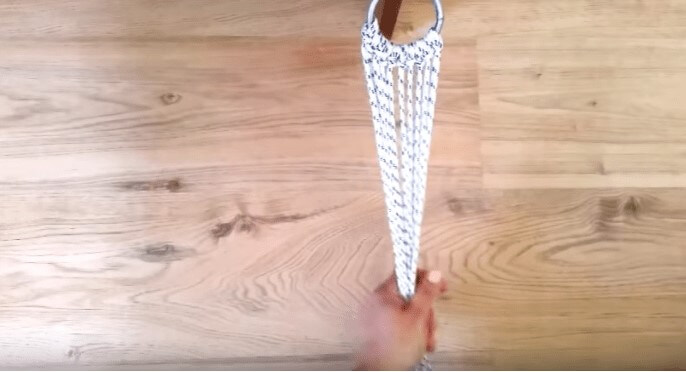
First things first, you will need to tie the cotton rope to one of the carbine hooks.
Take the first length and start by folding it in half, directly in the middle. Then, secure it to the hook using a cow hitch. A cow hitch is a very basic macramé knot, often referred to as the ‘lark’s head’ knot or lanyard hitch. It’s incredibly easy to do. Simply thread the folded end of the rope through the hook – from the back to the front. Reach through the loop and pull through the loose ends of your cotton rope.
This process should be repeated with all ten pieces of rope, pulling each one tightly into place.
2. Add the first wooden dowel
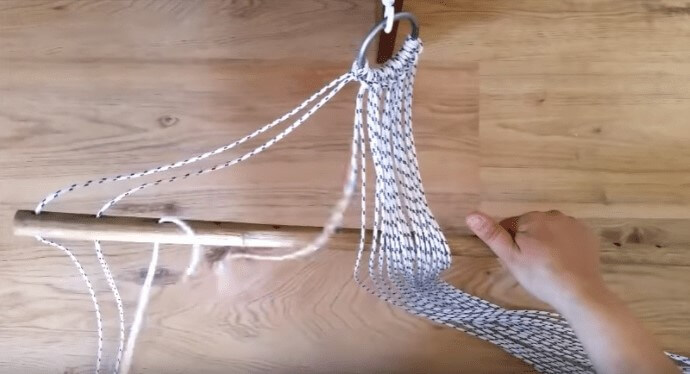
Next, prepare and add your wooden dowel to the design.
You will need to drill ten holes along the full length of the dowel. To ensure these are evenly spaced, use a ruler and mark each spot with a pencil. Once all of the holes have been drilled, position the steel hook above the dowel and thread each piece of rope through the corresponding hole.
3. Weave the macramé pattern
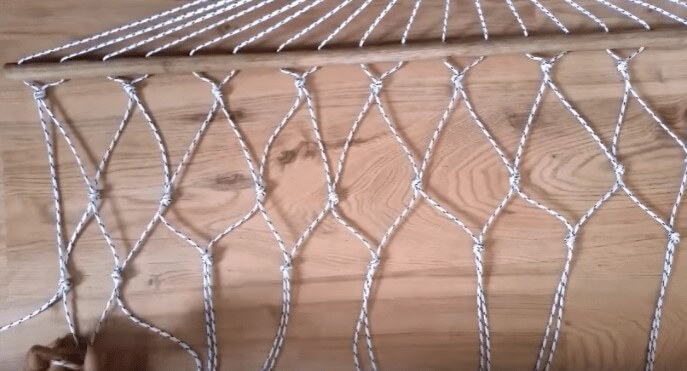
You’re now ready to start weaving your cotton rope hammock.
Starting from the left, take hold of the first two ropes and tie them together using a basic overhand knot. This knot should be about two inches below the wooden dowel. Repeat the process with the next two ropes, and then the next two, until the first row of knotting is complete.
To weave the second row, again you should start on the left-hand side. But this time, tie rope two and three together (and so on) – gradually working your way over to the right-hand side. Try to keep the knots in a straight line and, if you continue with the pattern, a loose diamond-shaped net will start to form.
4. Add the second dowel

Once you have finished the weave – and approximately a metre of rope is left – the second wooden dowel can be added. Just as before, drill ten (evenly spaced) holes along the full length of the dowel and thread the corresponding cotton rope through each. Ensure the dowel is positioned correctly.
5. Tie in the rope ends
The next step is to tie the rope ends to the second carbine hook.
Various knots will do the job nicely. However, we suggest using a double overhand. This is a fairly simple technique, but it will ensure the rope is securely and safely attached. And countless step-by-step tutorials can be found on YouTube to help.
6. Attach the hammock to a tree
Lastly, you will need to attach the rope hammock to your chosen trees.
Wrap the spare length of synthetic hemp around the trunk, with the soft-eye splice facing in the right direction. Repeat this process on the second tree. Then, once you’re happy they’re both securely in place, attach the hammock – by clipping each carbine hook onto the corresponding soft-eye splice. It’s as simple as that.
Create your summer rope hammock today
Fancy giving it a go? Why not? Here at Ropes Direct, we stock a range of products that are ideal for making a DIY rope hammock, including cotton rope (that is sold by the metre), synthetic hemp rope and stainless steel fittings. All of which are competitively priced and can be delivered to your home the very next day.
If you’d like further guidance on how to weave a rope hammock, and the best materials to use, you’re always welcome to get in touch. Our team have previous experience of this particular project and detailed knowledge of this type of rope and the fittings available. Just give us a call on 01692 671721 or send an email to info@ropesdirect.co.uk and we’ll get back to you as soon as possible.
Images courtesy of: https://blog.manomano.co.uk/